Urology
INSTRUCTIONS FOR USE
CYSTOSTOMY KIT
1. DEVICE DESCRIPTION
The Cystostomy kit consists of a pigtail catheter, a split cannula, a scalpel, a syringe, a fixing collar and a band clip (Fig. 1.). The polyurethane radiopaque catheter is ended with a pigtail tip with several holes inside the loop. The proximal end of the catheter has got a clamp that blocks the flow. The distal tip of the catheter is atraumatic. The catheter is available in many French [F] sizes with corresponding color-coded hubs.
-

Fig. 1. Components of the Cystostomy kit
- Pigtail catheter
- Split cannula
- Scalpel
- Syringe
- Fixing collar
- Band clip
2. PRODUCT RANGE
All available configurations of this device are presented in Table 1.
Table 1. Available versions
CATHETER
SPLIT CANNULA
Size
[F]
Length
[cm]
Color coding
Diameter
[mm]
Length
[mm]
8
45
blue
3,55
80
9
45
transparent green
3,55
80
10
45
red
4,60
120
11
45
navy blue
4,60
120
12
45
white
4,60
120
14
45
green
5,60
120
3. INTENDED PURPOSE / INDICATIONS
The cystostomy kit is intended for suprapubic urinary diversion and drainage for short term .
3.1. CONTRAINDICATIONS
The use of cystostomy kit is usually contraindicated in the following cases:
- insufficient filling of the bladder;
- bladder tumors;
- blood clotting disorders and/or antiplatelet or anticoagulation treatment;
- infection at the puncture site;
- pelvic fractures;
- previous abdominal or pelvic surgeries;
- patients with known allergy or hypersensitivity to polyurethane.
3.2. POTENTIAL ADVERSE EVENTS
Adverse events that may be associated with use of this device include (in alphabetical order), but are not limited to:
- allergy or hypersensitivity to polyurethane;
- bladder stones;
- catheter incrustation;
- catheter migration and loss of cystostomy access;
- catheter obstruction caused by blood, mucus or its kink;
- damage to the abdominal organ (e.g. perforation of the intestine);
- excessive granulation at the site of cystostomy;
- fever;
- hematuria;
- inadvertent catheterization of the urethra;
- infection;
- intra- or retroperitoneal extravasation of urine;
- pain;
- post-obstructive diuresis;
- urosepsis.
Any serious incident that has occurred in relation to the device should be reported to the manufacturer at reklamacje@balton.pl and the competent authority of the country in which the user and/or patient is established.
3.3. INTENDED USER PROFILE
Intended users of this device are only physicians who have received appriopriate training.
3.4. USE ENVIRONMENT
Use of this device is allowed only in healthcare facilities prepared for this kind of procedures.
3.5. PATIENT TARGET GROUP
Target group are patients requiring suprapubic bladder catheterization. No known data restrict use of this device in patients of particular gender or race. Before making a decision concerning use of this device, potential benefits and risks should be considered individually for every patient.
4. WARNINGS
- This device is designed for single use in a single patient only. Do not resterilize or reuse. Reuse or resterilization may compromise the structural integrity of the device and/or lead to device failure which, in turn, may result in patient injury, illness or death. Reuse or resterilization may also create a risk of contamination of the product and cause patient infection including the transmission of infectious disease(s). Contamination of the product may lead to injury, illness or death of the patient.
- Do not use if the package is opened or damaged.
- Do not use after expiration date given on the package label.
- Do not use if labeling is incomplete or illegible.
5. PRECAUTIONS
- The procedure should be performed after adequate preparation of the patient in the conditions of the procedure room.
- Perform the puncture in the midline to minimize bleeding.
- During puncture, the tip of the catheter should not protrude from the sharp needle tip - this may damage and/or shear off the tip of the catheter.
- The catheter should be evaluated on a regular basis according to the physicians’ instructions.
- The catheter should not indwell for more than 30 days. Leaving the catheter inside the patient’s body for longer period may increase the risk of complications including: catheter incrustation and catheter obstruction.
- Do not use excessive force while introducing, manipulating and removing the device. If resistance is felt, check the possible cause of resistance before deciding to continue the procedure.
- The patient should be given all information about the procedure and the correct conduct during and after the procedure.
7. HANDLING AND STORAGE
Store at room temperature in a dry place, in the case box as supplied. Do not expose to temperatures outside the range: 10 ºC ÷ 30 ºC.
8. DISPOSAL INSTRUCTIONS
Used product shall be treated as medical waste. After use dispose the product and packaging in accordance with healthcare facilities, administrative and/or local government policy.
10. OPERATIONAL INSTRUCTIONS
Balton sp. z o.o. shall not be liable for any direct, incidental or consequential damages resulting from the misuse of this product.
- Check the primary packaging (blister) for possible damage and expiry date.
If there is a suspicion that sterility may be compromised and/or the expiry date has been exceeded, it must not be used.
- Open the blister and take out the kit components.
- Check if the kit components are not damaged.
If there is a suspicion that the device is damaged it must not be used.
- Locate the urinary bladder with the use of ultrasonography.
Do not attempt insertion if the bladder cannot be located.
- Make sure the bladder is sufficiently filled
- Disinfect the skin according to the local procedures and cover with sterile drapes.
- Prepare the kit components, maintaining sterility.
- Anesthetize the puncture site.
- Make a small incision in the skin with a scalpel.
- Remove the needle’s protector.
- Introduce the catheter into the split cannula until the first mark on the catheter (Fig. 2.).
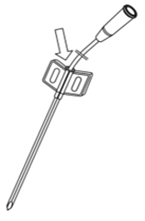
Fig. 2. Introduction of the catheter into the split cannula
- Evaluate whether trial puncture is required.
- Puncture the skin in the midline, 2-3 cm above the symphysis pubis, vertically to the abdominal wall under the ultrasound guidance (Fig. 3.).
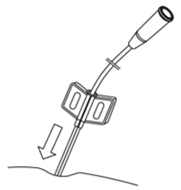
Fig. 3. Puncture of the skin in the midline
- Check if urine appears in the catheter.
- Close the catheter clamp.
- Insert the catheter deeper until the second mark is at the entrance of the split cannula (Fig. 4.).
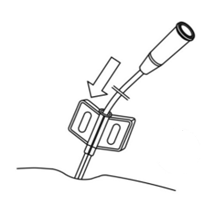
Fig. 4. Correct catheter insertion
- Remove the split cannula from the puncture site sliding it along the catheter until its distal end is out of the patient.
- Split the cannula by bending its wings in both directions (Fig. 5.).
Do not split the cannula inside the patient. The edges of split cannula are sharp – be careful when separating cannula halves.
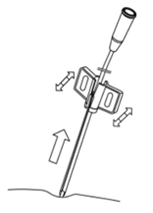
Fig. 5. Splitting of the cannula
- Tear completely apart and remove both halves of the cannula (Fig. 6).
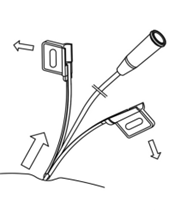
Fig. 6. Tearing apart the cannula
- Fix the catheter with the fixing collar and band clip (Fig. 7.).
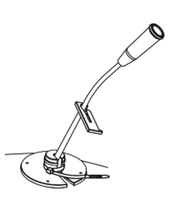
Fig. 7. Catheter fixing
- Connect urine bag to the catheter fixing the bag below patient’s bladder.
- Take off the clip to allow urine flow.
SYMBOLS GLOSSARY
-
CE mark
-
Medical device
-
Unique device identifier
-
Manufacturer
-
Date of manufacture
-
Use-by date
-
Catalogue number
-
Batch code
-
Consult instructions for use or consult electronic instructions for use
-
Do not use if the packaging is damaged and consult instructions for use
-
Caution
-
Sterilized using ethylene oxide
-
Do not resterilize
-
Single sterile barrier system
-
Single sterile barrier system with protective packaging outside
-
Non-pyrogenic
-
Keep away from sunlight
-
Fragile, handle with care
-
Temperature limit
-
Not made with natural rubber latex
-
n units per package
-
Keep dry
-
Recyclable packaging material
1. DEVICE DESCRIPTION
The Cystostomy kit consists of a pigtail catheter, a split cannula, a scalpel, a syringe, a fixing collar and a band clip (Fig. 1.). The polyurethane radiopaque catheter is ended with a pigtail tip with several holes inside the loop. The proximal end of the catheter has got a clamp that blocks the flow. The distal tip of the catheter is atraumatic. The catheter is available in many French [F] sizes with corresponding color-coded hubs.
-
Fig. 1. Components of the Cystostomy kit
- Pigtail catheter
- Split cannula
- Scalpel
- Syringe
- Fixing collar
- Band clip
2. PRODUCT RANGE
All available configurations of this device are presented in Table 1.
Table 1. Available versions
| CATHETER | SPLIT CANNULA | |||
|---|---|---|---|---|
| Size [F] |
Length [cm] |
Color coding | Diameter [mm] |
Length [mm] |
| 8 | 45 | blue | 3,55 | 80 |
| 9 | 45 | transparent green | 3,55 | 80 |
| 10 | 45 | red | 4,60 | 120 |
| 11 | 45 | navy blue | 4,60 | 120 |
| 12 | 45 | white | 4,60 | 120 |
| 14 | 45 | green | 5,60 | 120 |
3. INTENDED PURPOSE / INDICATIONS
The cystostomy kit is intended for suprapubic urinary diversion and drainage for short term .
3.1. CONTRAINDICATIONS
The use of cystostomy kit is usually contraindicated in the following cases:
- insufficient filling of the bladder;
- bladder tumors;
- blood clotting disorders and/or antiplatelet or anticoagulation treatment;
- infection at the puncture site;
- pelvic fractures;
- previous abdominal or pelvic surgeries;
- patients with known allergy or hypersensitivity to polyurethane.
3.2. POTENTIAL ADVERSE EVENTS
Adverse events that may be associated with use of this device include (in alphabetical order), but are not limited to:
- allergy or hypersensitivity to polyurethane;
- bladder stones;
- catheter incrustation;
- catheter migration and loss of cystostomy access;
- catheter obstruction caused by blood, mucus or its kink;
- damage to the abdominal organ (e.g. perforation of the intestine);
- excessive granulation at the site of cystostomy;
- fever;
- hematuria;
- inadvertent catheterization of the urethra;
- infection;
- intra- or retroperitoneal extravasation of urine;
- pain;
- post-obstructive diuresis;
- urosepsis.
Any serious incident that has occurred in relation to the device should be reported to the manufacturer at reklamacje@balton.pl and the competent authority of the country in which the user and/or patient is established.
3.3. INTENDED USER PROFILE
Intended users of this device are only physicians who have received appriopriate training.
3.4. USE ENVIRONMENT
Use of this device is allowed only in healthcare facilities prepared for this kind of procedures.
3.5. PATIENT TARGET GROUP
Target group are patients requiring suprapubic bladder catheterization. No known data restrict use of this device in patients of particular gender or race. Before making a decision concerning use of this device, potential benefits and risks should be considered individually for every patient.
4. WARNINGS
- This device is designed for single use in a single patient only. Do not resterilize or reuse. Reuse or resterilization may compromise the structural integrity of the device and/or lead to device failure which, in turn, may result in patient injury, illness or death. Reuse or resterilization may also create a risk of contamination of the product and cause patient infection including the transmission of infectious disease(s). Contamination of the product may lead to injury, illness or death of the patient.
- Do not use if the package is opened or damaged.
- Do not use after expiration date given on the package label.
- Do not use if labeling is incomplete or illegible.
5. PRECAUTIONS
- The procedure should be performed after adequate preparation of the patient in the conditions of the procedure room.
- Perform the puncture in the midline to minimize bleeding.
- During puncture, the tip of the catheter should not protrude from the sharp needle tip - this may damage and/or shear off the tip of the catheter.
- The catheter should be evaluated on a regular basis according to the physicians’ instructions.
- The catheter should not indwell for more than 30 days. Leaving the catheter inside the patient’s body for longer period may increase the risk of complications including: catheter incrustation and catheter obstruction.
- Do not use excessive force while introducing, manipulating and removing the device. If resistance is felt, check the possible cause of resistance before deciding to continue the procedure.
- The patient should be given all information about the procedure and the correct conduct during and after the procedure.
7. HANDLING AND STORAGE
Store at room temperature in a dry place, in the case box as supplied. Do not expose to temperatures outside the range: 10 ºC ÷ 30 ºC.
8. DISPOSAL INSTRUCTIONS
Used product shall be treated as medical waste. After use dispose the product and packaging in accordance with healthcare facilities, administrative and/or local government policy.
10. OPERATIONAL INSTRUCTIONS
Balton sp. z o.o. shall not be liable for any direct, incidental or consequential damages resulting from the misuse of this product.
- Check the primary packaging (blister) for possible damage and expiry date.
If there is a suspicion that sterility may be compromised and/or the expiry date has been exceeded, it must not be used.
- Open the blister and take out the kit components.
- Check if the kit components are not damaged.
If there is a suspicion that the device is damaged it must not be used.
- Locate the urinary bladder with the use of ultrasonography.
Do not attempt insertion if the bladder cannot be located.
- Make sure the bladder is sufficiently filled
- Disinfect the skin according to the local procedures and cover with sterile drapes.
- Prepare the kit components, maintaining sterility.
- Anesthetize the puncture site.
- Make a small incision in the skin with a scalpel.
- Remove the needle’s protector.
- Introduce the catheter into the split cannula until the first mark on the catheter (Fig. 2.).
Fig. 2. Introduction of the catheter into the split cannula
- Evaluate whether trial puncture is required.
- Puncture the skin in the midline, 2-3 cm above the symphysis pubis, vertically to the abdominal wall under the ultrasound guidance (Fig. 3.).
Fig. 3. Puncture of the skin in the midline
- Check if urine appears in the catheter.
- Close the catheter clamp.
- Insert the catheter deeper until the second mark is at the entrance of the split cannula (Fig. 4.).
Fig. 4. Correct catheter insertion
- Remove the split cannula from the puncture site sliding it along the catheter until its distal end is out of the patient.
- Split the cannula by bending its wings in both directions (Fig. 5.).
Do not split the cannula inside the patient. The edges of split cannula are sharp – be careful when separating cannula halves.
Fig. 5. Splitting of the cannula
- Tear completely apart and remove both halves of the cannula (Fig. 6).
Fig. 6. Tearing apart the cannula
- Fix the catheter with the fixing collar and band clip (Fig. 7.).
Fig. 7. Catheter fixing
- Connect urine bag to the catheter fixing the bag below patient’s bladder.
- Take off the clip to allow urine flow.
SYMBOLS GLOSSARY
-
CE mark
-
Medical device
-
Unique device identifier
-
Manufacturer
-
Date of manufacture
-
Use-by date
-
Catalogue number
-
Batch code
-
Consult instructions for use or consult electronic instructions for use
-
Do not use if the packaging is damaged and consult instructions for use
-
Caution
-
Sterilized using ethylene oxide
-
Do not resterilize
-
Single sterile barrier system
-
Single sterile barrier system with protective packaging outside
-
Non-pyrogenic
-
Keep away from sunlight
-
Fragile, handle with care
-
Temperature limit
-
Not made with natural rubber latex
-
n units per package
-
Keep dry
-
Recyclable packaging material